Favorite Color? Rainbow - JustNick Design Team Assignment

Hi! I had a free choice of cut files this week, so I chose the Tiny Stems Background. I loved the fact that it is so delicate and for me it resembles lace.
 
I have been wanting to use my Felicity Jane Brooke Kit for ages and now I had the chance. I wanted to document a photo of my daughter of when she was 5. when asked what her favorite color was, she would always respond with a dreamy "Rainbow". I decided to make to cut file a full 12x12 page and cut it out on my Silhouette with Bazzill Marshmellow, card stock. I cut it out ones with a blade setting of 4 and a chose the double cut function, but that still did not cut through the paper. So I wasted a perfectly perfect 12x12 sheet of Bazzill Marshmellow. But then I changed the blade setting to 6 and still had it on double cut, and that worked like a charm! The cut file peeled off the mat beautifully!
I layered the cut file over the rainbow paper from Felicity Jane and then I proceeded to embellish. I used some Studio Calico journaling cards for layering behind my photo and some paper from my stash. The rest is all Felicity Jane Brooke and Brie kit embellishments. 
Here are some close ups!

Here is the final layout!
I hope you found this inspirational. You can take a file and use it just like that, as a big 12x12 mat for your photo!
I you would like to watch the Process Video for this layout please click here.
Enjoy!

Favorite - Paper Issues Design Team Assignment

Hi everyone! 
My assignment was "Puttin' on the Glits". 
If you follow me you will know that I usually scrap by collection. I still have to make that shift in my brain that it is okay to mix collections! Weird, I know! But with this layout I made it a mission to do just that, mix collections! I used Pink Paislee Auburn Lane, Crate Paper Flourish and Crate Paper Wild Heart. I got it right to use three collections on one page! That is huge for me you guys! 

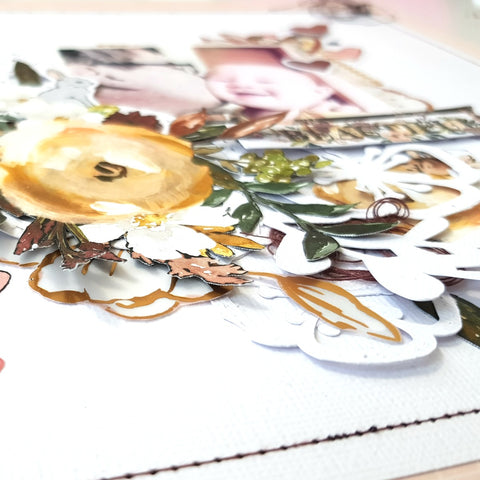
I fussy cut flowers from one of the sheets from the 6x8 paper pad and from one of the 12x12 papers from Auburn Lane. Those served as my main embellishments. I also pulled out a 6x8 sheet from the same collection to layer behind my photo. For the rest of the layering I used 6x6 sheets from the Flourish collection. I also used two Vellum ephemera pieces from Flourish, with the swan vellum piece serving as the inspiration for this layout. I love the subtle sketchy and wispy nature of the little piece, and the rose gold would serve as a great 'Glits' addition. 

I also ventured outside the realm of the stark white background and chose a 12x12 patterned paper from Auburn Lane. It too has a very subtle print. So with all my elements carefully chosen the gluing began. 

The main 'Glits' on my layout is the title and the small hearts at the top left hand corner of the photo. These are from the Wild Heart collection, and adds just the right amount of shimmer and sparkle without detracting from the rest of the layout. 

I have scrapped this photo of me and my husband on our 10 year anniversary before, but there are no rules that state that you can only scrap a photo once! I don't journal on all my layouts, but I decided that I needed to tell a story in words as well as pictures. I used my WRMK Typecast and cut the sentences into strips and adhered them next to the photo. 

I felt that the background needed something more, so I splattered some Black Heidi Swapp Color Shine onto the background, I wanted the splatters to resemble ink splatters. 

Compositionally speaking, there are a few aspects to consider. The main area of embellishing runs across the page in a horizontal path, through the middle of the page. The swan Vellum piece is offset just a little above the main line of embellishment, encouraging the eye upwards to the top right hand corner of the page, thus I added the black splatters to the top right hand corner of the page and then to add balance to the page, I added black splatters to the bottom left hand corner of the page. Thus, the splatters adds a diagonal aspect to the composition. The eye is drawn from the top right hand corner down to the bottom left hand corner of the layout. The negative spaces in the top left hand and bottom right hand corners of the page serves as a balance to the diagonal line. Far from being negative spaces, these two spaces keep the composition together. 

Here are a few close ups of my layout...


Here is the final product...


If you, like me, are a stickler for process videos, please click here to watch my process on YouTube.
I hope that you are inspired to add some sparkle and glits to your layouts, don't be afraid slap on the glitter pieces and never skimp on that gold!!!

Enjoy!

Stay wild - JustNick Design Team assignment

Hi everyone.
 My assignment for today was to make a layout to do with Fall or Halloween, and I chose to do a layout about Fall, however, where I grew up we saw Autumn.
I used the Fall Florals cut file.


I filled a whole 12x12 page with the cut file and also resized them, so that I would have different sizes to work with in my layout. I had my Silhouette cut out the florals of Textured White American Crafts Cardstock. To resize the cut files I had to undo the compound path. Then I drew a bounding box around each individual shape and reselected it's compound path. This freed up each shape so that I could move it around individually and resize it as I saw fit. 
I used the new collection from Cat Martin called Norwegian Wood. It is a print and cut collection. 
I basically created a wreath around my 12x12 page with a combination of the cut files and layered the Norwegian Wood embellishments above and below the cut files. And that is that, not much else really, just a lot of layering!! 
If you are a stickler for process video like I am, click here to see the process to this layout on my YouTube channel.
Here are some close ups of my layout...


Here is the final product...


Enjoy!

Let's go! - Leslie Berner

Hi Everyone! It's Leslie on the blog today. I got to make one of my favorite kind of layouts, and that is to use a cut file as my focal point of my page. 

I used the beautiful ' Let's go vacation geo tags' cut file from the Paper Issues shop, and as you all know all these fantastic cut files are for FREEEEE. 

I used the 'Imagine That' girl collection from Eco Park and then added some ' Oh my Heart' from Pink Paislee for the final touches. I used papers from the 6x6 'Imagine That' paper pad to back the letters of the cut file. if you look closely I tried to alternate dark busy patterns with lighter softer patterns, for instance, the 'L' is a darker plaid and the 'E' is a lighter floral print, then the 'T is a soft cloud print that contrast with the vibrant rainbow print I used to back the 'S'. 

I wanted to do some mixed media on this layout, so I busted out my Gelato's and used the Gauva, Bubblegum, Metallic Mint, Metallic Blueberry and Iced Pear to create a watercolor rainbow effect behind my photo. to achieve this effect I used the packaging technique. This is when you take an old piece of plastic packaging, you add your paint or Gelato straight to the plastic, you smoosh it around a little and then you turn the plastic face down unto your layout and proceed to smudge the color of the paint or the Getalo unto the paper. It is a very fun way get organic shapes and lines. It is very easy as well. So if you are scared of mixed media, try this technique. 

I used a lot of layering behind my photo, I used the off cuts from the paper I used to back the cut file as the layering, so nothing goes to waste.

The rest is pretty self explanatory, I embellished with some of the stickers from the 12x12 sticker sheet as well as the 6x12 chipboard sheet. To finish off the final details I pulled out my Paige Evans Sticker Book and chose some elements from the 'Oh my Heart' section as I think that the colors match the Echo Park collection [pretty nicely.

Here are some close ups....


Here is the final layout....


I hope this inspired you to take on the challenge of using a large cut file as a focal point in your page as well as taking a shot at mixed media.

You&Me

Hi! It's Leslie on the blog today, thanks for stopping by!
This week is the beginning of the new month and lots of new challenges and beautiful new cut files!
This  week we have the freedom to choose any cut file from the shop to use in a layout, and I chose the Floral Swag 4 cut file. 


I had my Silhouette cut it out of plain white American Crafts Card stock. I resized the file to a larger and a smaller version. 

I used the Auburn Lane collection from Pink Paislee for this page. 
I layered white card stock on a patterned page from the collection and used my WRMK ( We R Memory Keepers) sewing machine to stitch around the edge of the white card stock. I used a maroon colored thread. 

I decided I wanted to put my photo in the center of the page, and have the main embellishing cluster to the bottom left hand side of my photo. I layered the cut files and the fussy cut flowers to create a full, vibrant cluster. I wanted it to look very full, like a bunch of flowers. I cut the sprigs from one of the cut files off and added them to the cluster for extra detail, and I also cut free some flowers from the same cut file and layered them randomly around and underneath the big cluster.I added a smaller cluster to the top right hand of the photo to balance out the larger cluster. To add some extra color, I tucked some thread nests in behind the cut file.

Here are some close ups...


Here is the final layout...


I love how this layout turned out! I love the detail and whimsy the cut file adds to the floral cluster. 
Enjoy!